Topic: Intel SDK-85 8085 System Design Kit
Date: 2013 JAN 02
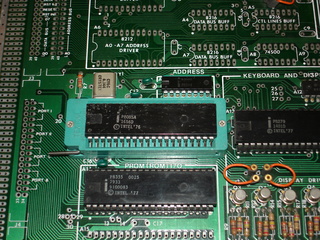
I’ve been keeping an eye out for an original Intel SDK-85 (Wikipedia article) since getting into 8085 system design. The SDK-85 is the official Intel product for sampling the MCS-85 family in a rapid development package, and comes with parts to build a minimal SBC system complete with ROM monitor using a front panel style keyboard and LED 7-segment displays. Unfortunately, they’re usually out of my price range in known working condition nowadays. I’d been scared off from cheaper units of unknown condition by the inclusion of a 8355 ROM/IO device, which uses mask ROM and isn’t available with the monitor program anymore – anyone who has attempted to find a replacement for a defective KIM-1 RRIOT knows about that! After reading the manual (available from bitsavers), I discovered that the monitor ROM could be either an 8355 or its UV-erasable cousin, the 8755(A). This significantly decreased the chances I’d end up with a bricked board useful only as spare parts, and so I ended up with this “AS-IS, untested” board from a popular Internet auction site:
The board was mostly clean, all keys were present, and the minimal configuration of ICs were present. Someone had installed a 3M Textool ZIF socket for the 8085. Other than the base configuration, only a socket for an additional 8355/8755(A) was present. As it arrived, the board did not function properly. The memory address decoder was suspicious, as it was socketed in a wire-wrap socket that was only half inserted into the board. On closer examination, the socket was simply stuck in, not soldered at all! I discovered numerous other missed pins from the original assembler. After correcting the missed joints and touching up a few cold joints, the SDK-85 came up with its correct “- 8085” prompt:
The SDK-85 was run through a few short test routines, starting with a tight loop to experiment with the single-step function. After that, another routine was run to test a few bits of Port 0 and an additional 8155 installed for 256 bytes of additional RAM. These tests passed first time, meaning I now had a fully functional basic SDK-85!
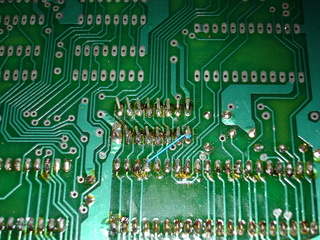
I decided to keep the (now soldered) wire wrap socket for the memory address decoder as it allows easy access to the decoded but unused segments of memory. There was a fix applied by the previous owner using one of the pins of the socket and a bit of Kynar to replace a lifted trace between the address decoder and the 8085 – likely the cause for the installation of the wire wrap socket to begin with. It was a bit messy and wrapped in the middle of the pin, so it was replaced:
Next, I’ll work on building a custom power supply to free up my bench supply and provide a greater degree of portability for the SDK-85. Eventually the expansion bus drivers will be populated and the system expanded to make it more useful for my end goal: using the SDK-85 and a standalone assembler for 8085 development.


